Week 1: Intro to Nuke.
Week 1, was an introduction to Nuke, this will be one of the most exciting modules for me because I would love one day to become a VFX supervisor. I have already spoken with a couple of people and one of them is my mentor Liam Spencer, a leader compositor in ILM, and some of my colleagues at work. Russell Dodgson and Gavin Mckenzie both work in the TV show His Dark Materials as VFX supervisor and VFX producer manager. Both of them have started in Framestore as Junior compositors. Working as a Lidar Technician in His Dark Materials is giving me so much knowledge of how the production works and how the different departments work one with each other.
The first week was an introduction to the module, where we saw the different topics we are going to go through during the first semester.
How to set up the location of your file. This is the MOST important thing to have a good base within your projects
Self-recording of my introduction to Nuke
I could just have some screenshots of the quick introduction of Nuke with the viewer window and the properties window, node window and in the left side hand, we have the node toolbox. But for me, it is much easier to remember this way see myself doing it.
THE MOST COMMON NODES
(Accessed via [tab] button or shortcut key)
-
Blur – A node for blurring the image
-
Copy (K) – Used to bring extra channels into the mainstream
-
Defocus – Used to defocus the image replicating camera defocus
-
Erode(filter) – Generally used to expand or contract the edge of an alpha channel.
-
Frame Hold - Freeze's footage on a selected frame. Used a lot for clean up patchwork
-
Grade (G) – for applying colour correction changes
-
Keylight – Primary blue/green screen keying node
-
Keymix – A type of merge that allows you to mix two keys together through the use of a mask...
-
Merge (M) – Used to composite two elements together
-
Premult – A multiply operation between the RGB and Alpha of an image. It effectively cuts the image out based on the alpha channel present.
-
Reformat – Allows changes to the resolution of everything upstream of this node.
-
Read – A node that allows you to bring the footage into Nuke
-
Roto (O) – Used to create a matte Roto/
-
Paint (P) – Used to create mattes, painting, cloning, and paint reveals
-
Time Offset – A node that offsets the frame range of footage
-
Tracker – A transform node that tracks pixel values in an image. Used to composite elements into a shot and match the movement within that shot.
-
Transform (T) – for changing spatial coordinates of an element
-
Write - This allows you to render your comp out to file.
Week 2: The organization & Roto
During week 2 we were focused on the bases of the roto, with the different tools, as the different pencils and the different nodes you must apply to make this work. Copy node, roto node, blur just in case the edges of your alpha is not that perfect or the edges that you tried to cover were not that perfectly done.
It allows you to create and edit Bezier and B-spline shapes
MY MASK

Creating Common Nodes.
-
G- grade node.
-
K- copy node.
-
M- merge node.
-
O- roto node.
-
P- rotopaint node.
-
R- read node.
-
W- write node.
MY NODES

The first exercise was the rotoscope of this yellow bean, in my nodes, you can see what different nodes I have used for this task, it is very important to connect them in the right way. otherwise you will start seeing errors or not seen what you want to achieve.
In the video below are the breakdown and the explanation (auto-recordation) of the process I must follow to achieve the basis of rotoscoping
The first task of Roto
The second task of Roto
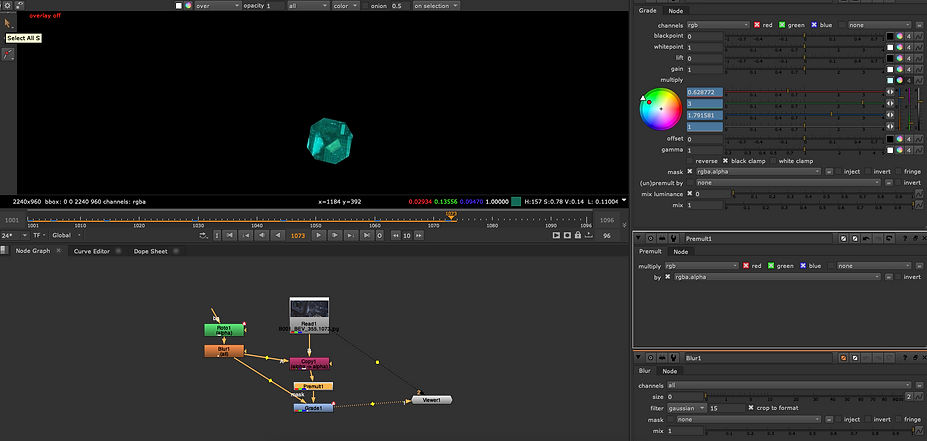
In the images below you can see my node viewer where the nodes are perfectly made following the path. In addition, you can see in the properties viewer how the colour is also keying to change colour following the mask (roto).

Week 3: The complex Rotoscope
Been one of the most important skills to get a job in any post-production house as an entry or junior level compositor. It is one of the boring jobs in the industry but if you wanna get a job as a compositor you should need a good basis for it because it would be the requirement for you.
This will be a good example of a great rotoscope and complex. A Scanner Darkly is a movie starring Keanu Reeves and Robert Doney J
Raw footage
Here is the area where I will be focusing my roto, using the vezier tool, around the thumb


Final out come of how will look in the viewer window

Recording of the complex roto to the thumb
I the recording I have left some of the problems I had to remember in the future Problems like the save problem I had with the name of the file that was saying that the name wasn't right for the file. After that, I did also had one more problem with hiding my mask I couldn't hide using the short cur M to hide the mask. Try a couple of times. The problem was that I didn't have the right node selected with the roto and the different layer in the roto. Using some blur to make the edges of the thumb a bit softer. I did also ad some blur into the edges of my mask part of the blur node.
The node of the complex Roto
This is the final outcome of my Node view, be aware that sometimes if you don't have pointing the arrows in the right node won't work.

Week 4 basic keying.
This week another important skill, and a potential opportunity to get a job in the industry would be Keying. I was looking and basic keying and some other concepts like Garbage Mattes, Luma Key and multiples exercises some trick within our workflow.


The node of the Luma Keying_01


Video workflow Luma_keying_01
Second Luma Keying

The node of the Luma Keying_02

Video workflow Luma_keying_02
Key_light
Chroma Key practice (greenscreen)

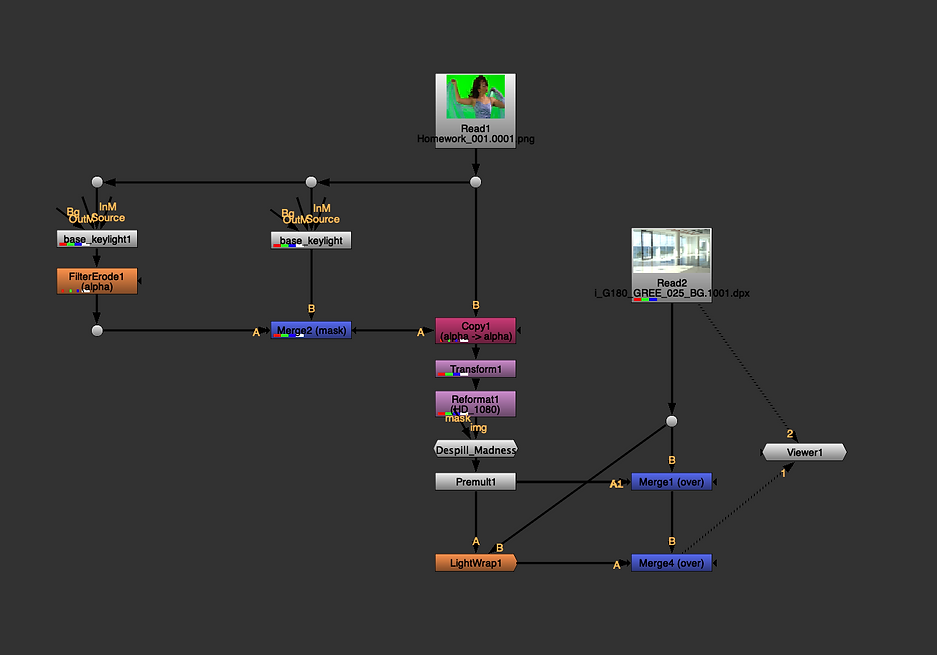
The node of the chroma Keying_01

Video workflow Chroma_keylight_01
Video_done
Homewor_key_practice_02

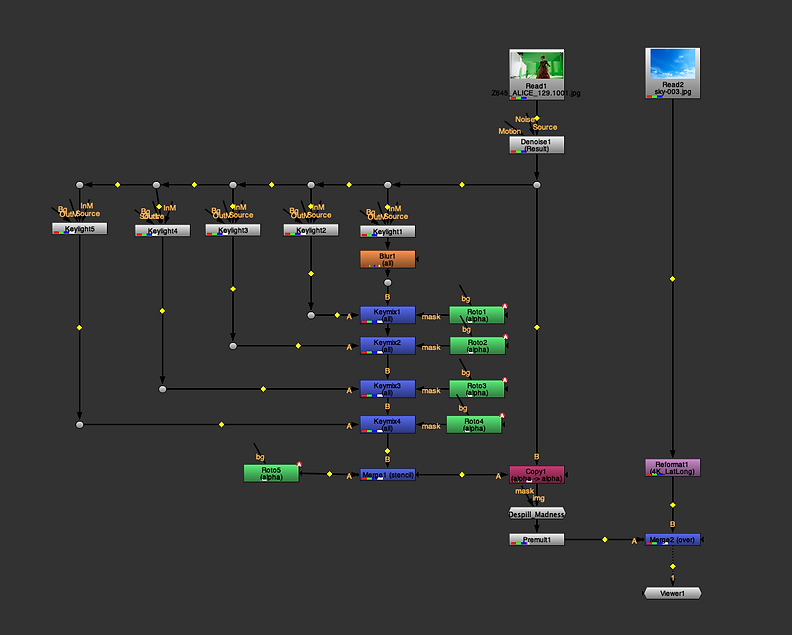
The node of the chroma Keying_02
Video workflow Chroma_keylight_02
My notes for the Different keying:
Luma Keying_workflow


Keylight_workflow


Week 5: Advanced keying.
Using more techniques and different workflows during Week 5 in advanced keying. We began with a piece of node already done, to help us polish those details by the edges.
This is the node from the practice of last week where I have already used the additive key. it is also visible in the recordings from last week

Video workflow additive key
Advanced keying


Video workflow Advanced Keying
Fina Image


Video Final Result


Week 6: Tracking in Nuke
During this week we were looking at different types of tracking, one point tracking, two-point tracking and planar tracking. I have recorded a follow this process as we did in class.
One-Point Tracking
Process of the One-Point Tracking
The node of One-Point Tracking

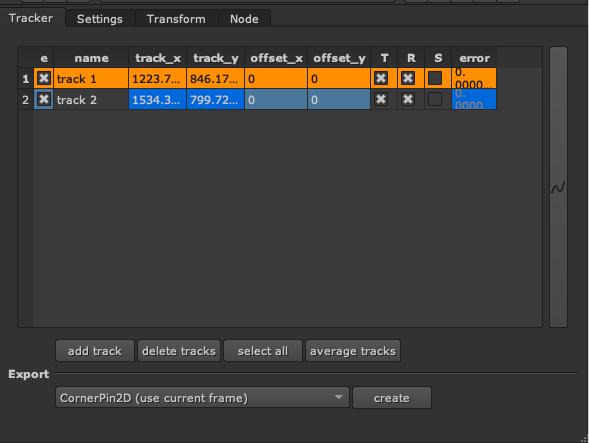
Two-Point Tracking
Process of the Two-Point Tracking
The node of Two-Point Tracking


Planar Tracking
Process of the Planar Tracking
The begging of node Planar Tracking


Colour grading for the car's plate.
The node of Planar Tracking

Week 8: Colour and Grading
Colour correction, compensation, light correction and matching components in the scene were the main point of the week 8 lecture. Following the steps of Match Luma then Tones.
Process of Colour and Grading on the women
Final Result

The final Node

Process of Colour Grading and roto the floor for the shadow
The final Node


Process of Colour Grading and roto the door
The final Node


Process of Colour Grading Final Task
Beginning of the Task

Final task Done


The final Node


Week 9: Cleanup & Patch Repair
Cleanup Roto Paint and Tracker
Roto Paint (clone tool)
Process
Final outcome


Final Node
Cleanup Static Patch Process

Final Node

Week 10: Complex Cleanup
Cleanup Crowd Process

Final Node

Final outcome


PATCH ON THE MOVING WATER
Final outcome


Final Node

Week 11: Complex Cleanup
Task 1: Logo removal and replacement


Task 1: Logo removal and replacement. Process
RAW
FINAL
Node graph

Task 2: Removal green screen and keylight


Task 2: Removal green screen and keylight. Process
RAW
FINAL
Node graph

Assessment

You will need to download and copy the data to your machine, create the Comps, and submit your .nk and final quicktime videos that you have exported from Nuke here.
We want 2 shots completed.
1. One that is about matching the reference video which can be found in quicktimes folder. This will show your skills in Nuke, your ability to be accurate and layout scripts in a professional manner.
2. Secondly develop the first shot by being creative. What can be done to this shot that makes it interesting and shows off your artistic skills.
RAW
FINAL
First part: technic

Final First Part
Node graph


Second part: creativity
Resources

Breakdown


Breakdown
Final Result
Node graph


